Pages

12.30.2008

Oreo Truffles

I first had these little nuggets of goodness last year at Christmas. My aunt made them and they were rightfully hidden from us most of the time. To say they are awesome is an understatement. So, when I came across the recipe on Bakerella's blog, I just had to make them. She does a cute Hershey Kisses Valentine version I think I will try in February.

Oreo Truffles

1 package oreo cookies
1 8oz. package cream cheese (softened)
white chocolate bark

1. Finely crush cookies and stir in softened cream cheese. Use the back of a large spoon to help mash the two together.

2. Roll the mixture into 1" balls and place on wax paper covered cookie sheet.

3. Melt chocolate as directed on the package and then dip balls into chocolate, tap off extra and set aside on wax paper covered cookie sheet to dry.

4. Once dry, refrigerate and enjoy! Makes about 36 truffles.

The Windy City

One of the first things I did after we decided to head to Chicago after Christmas for a little R&R was book a reservation at Rick Bayless' restaurant Topolobampo. I've been watching Rick for years on his PBS show, Mexico: One Plate at a Time (I could watch cooking shows ALL DAY). Topolo is connected to his other Chicago restaurant, Frontera Grill. After looking online at both the menus, we decided on Topolo. If you plan on stopping in at either one of these (and I think you should), I strongly recommend a reservation. Both places were packed! We couldn't even find a spot for a pre-dinner drink at the bar. Frontera was a lot more laid back and Topolo was a nicer, more "upscale" side.

At Topolo, you can order a la carte or they have three tasting menus to pick from. Each tasting menu is 5 courses and you can opt to have a wine pairing with each course. The server suggested a tasting menu, that way you get to try the most dishes. I chose the Celebration Tasting Menu and Jeff had the Holiday Tasting Menu. We passed on the wine and went for their famous Topolo Margarita. It took us over 2 hours to complete dinner. By the end, I was so full and happy that I wanted to try out Frontera Grill the next day.

I didn't feel comfortable taking pics in the restaurant. But, thanks to the World Wide Web, I was able to find a description and pictures of everything we had. And, a copy of the margarita recipe. Which we have already made since returning ;-)

This was, by far, one of the best meals we have ever eaten. Not only was the food delicious, but the service was awesome. The server knew the menu inside and out and we were never without a fresh margarita.


Topolo Margarita
Made in a shaker and served tableside
Makes about 2 cups, serving 4

Ingredients
Finely grated zest of 1 1/2 limes, about 1 teaspoon
1/2 cup fresh lime juice (about 2 large limes...we used 8 small limes)
1/4 cup plus 1 teaspoon sugar
Lime wedges
Coarse salt
3/4 cup Sauza Conmemorativo tequila
2 tablespoons plus 2 teaspoons Gran Torres orange liqueur OR 2 tablespoons Grand Marnier
About 1 cup coarsely broken ice cubes

Directions
1. Making 1 1/4 cups of tangy limeade: combine the lime zest, lime juice, sugar and 10 tablespoons of water in a glass or plastic pitcher. Cover and refrigerate for at least 2 hours (but no longer than 24 hours). Strain into another pitcher.

2. Finishing and serving the margaritas. Rub the rims of 4 martini glasses with a lime wedge, then dip them in a dish of coarse salt. Refrigerate the glasses if desired. In a shaker, combine the limeade, tequila and orange liqueur. Add ice and shake 10 to 15 seconds, then strain into the prepared glasses.

Celebration Tasting Menu

Tacos de Huitlacoche, Estilo Escuinapa
Crispy tacos of Tracey's huitlacoche, roasted vegetables and truffle, doused with tomato broth and topped with crunchy pickled vegetables and avocado.

Sopa Invernal
Creamy parsnip soup with applewood-smoked Gunthorp chicken, chipotle-roasted fennel and fennel pollen.
Langosta a la Yucateca
Achiote-marinated Maine lobster, pan-roasted, Yucatecan pipian. Amaranth polenta (infused with pumpkinseed sikil pak), garlicky Snug Haven spinach, toasted pepitas, crispy epazote.

Borrego en Salsa de Chile Guajillo y Pera
Roasted rack of Elysian Fields lamb in pear-infused red guajillo chile sauce. Layered budin of Nichols potatoes, Honey Crisp apple and bacon; cascabel-tomatillo salsa; roasted pear; "shoots" salad.
Pastel de Chocolate, Cremosa de Vainilla, Fresas Confitadas
Warm, fudgey chocolate cake, panna cotta-style custard scented with Mexican vanilla, confit of Mick's Michigan strawberries.


Holiday Tasting Menu


Salmon Curtido con Ensalada de Noche Buena
House-cured Alaskan King salmon with Mexican holiday salad of agave-braised beets, crunchy jicama, tangerine and Bayless Garden microgreens. Roasted peanut dressing, Collins citrus-infused white fish roe.

Uchepos Gratinados
Three Sister's Garden sweet corn tamales, steamed in corn husks, then baked with chilaca chile cream and dry Jack cheese. Buttery wild chanterelle mushrooms, freeze-dried sweet corn, watercress.

Atun Sellado con Bacalao
Pan-roasted rare Hawaiian ahi tuna with Ana Elena's celebration bacalao (cod simmered with red pepper, tomato, capers, olives, white wine). Steamed potatoes, "wilted" Snug Haven spinach, fried parsley salad.

Puerco en Mole Negro (de Lujo)
Maple Creek Farm pork three ways: grill-roasted pork loin, 12-hour-braised pork belly, adobo-roasted pork shoulder. Served with classic Oaxacan black mole (made from chilhuacle chiles and 28 other ingredients), Iroquois white corn tortas (infused with Tracey's green garlic), grilled green beans, roasted knob onions and three nut crunch.

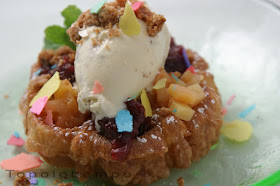
Bunuelo de Viento, Helado de Jengibre
Ana Elena's grandmother's crispy rosette "fritter" with slow-poached quince and tequila-infused cranberry salsa. Ginger cookie ice cream.

12.23.2008

Karmel Korn

Better late than never! This is one of my favorite Christmas treats. Not only is it highly addictive, it is simple to make. Those are two important qualities in a Christmas goodie.


Karmel Korn

2 sticks butter
2 c. brown sugar
1/2 c. Karo (light)
1/2 tsp. baking soda
2 pkgs. corn puffs

Boil the butter, brown sugar and Karo for 5 min.


Stir in the baking soda. (This will bubble up.) Pour over corn puffs and stir until well coated.


Bake at 250 degrees for 1 hour. Turn every 15 minutes.


I have a pile of recipes I need to post as well as a trip to Chicago to report on, including a fabulous meal at Rick Bayless's restaurant, Topolobampo.

12.14.2008

Peppermint Bark

This has to be one of the easiest and tastiest treats to make for the holidays. The recipe below is a rip-off of the Williams Sonoma Peppermint Bark and it tastes just as good! I made two batches and will be giving it out to my co-workers. As long as we don't eat it all first.

Peppermint Bark
from AboutEating.com

12 oz chocolate chips
1 pound white chocolate chips
1/2 teaspoon peppermint extract
1/2 cup peppermint candy, crushed

Preheat oven to 250. Line a 9x13 pan with foil, letting it hang over the sides. Spray foil. Pour the chocolate chips in an even layer on the foil.


Place in oven for 5 minutes or until almost melted. Meanwhile, crush up some candy canes.


Remove the chocolate chips from the oven and smooth with an offset spatula or knife.

Place in refrigerator until cold and firm, about 20 minutes. Melt white chocolate chips in a double boiler or in a metal bowl over simmering water (don’t let bottom of bowl touch water), until chocolate is almost melted. Remove bowl from water and stir until completely melted, stirring in extract. Let cool a little bit so it doesn’t melt the chocolate layer when you pour it on top. Pour this over the chocolate layer, and, working quickly, spread to cover. Sprinkle with crushed candy.

Chill until both layers are firm. Lift foil out of pan and shake off excess candy. Trim edges. Cut into 2” wide strips. Peel bark from foil and cut each strip as desired. Chill in covered container. Makes about 2 pounds.

12.11.2008

Cranberry Orange Polenta

Since discovering polenta a few months ago, I have made it several times. It is so quick to whip some up and doesn't require alot of work. This recipe in Rachael Ray's magazine caught my eye (I know...again with RR!). We paired this with Mahi-Mahi, that Jeff spiced with ginger and orange zest and it was delicious. I made Jeff's without the cranberries and just tossed some into mine at the end. It was great either way!


Cranberry Orange Polenta
from Rachael Ray
Serves 4

2 cups of chicken broth
1/2 cup dried cranberries
grated peel of one orange
1 cup of milk
3/4 cup polenta (or corn meal)
2/3 cup grated Parmesan or romano cheese (we used a mix)
2 tbls of butter


In a medium saucepan, bring the chicken broth, cranberries and orange peel to a boil over medium-high heat. Lower the heat and simmer for 5 minutes. Stir in the milk and return to a boil. Whisk in the polenta and cook, whisking, until thickened, about 5 minutes. Turn off the heat and whisk in the cheese and butter. Season with salt and pepper and serve!


12.08.2008

Tuesdays with Dorie: Grandma's All-Occasion Sugar Cookies

First, just so there isn't any confusion, I think it is important to point out that these aren't MY Grandma's sugar cookies. These are Dorie's Grandma's sugar cookies. I was looking forward to trying this week's TWD recipe, chosen by Ulrike of Küchenlatein. Growing up, making frosted sugar cookies was a big deal. All of us kids would head to Grandma's house, where we had our pick of green, red, blue, and yellow frosting and a variety of sprinkles. Most of the time, the cookies barely made it to the platter (for us to share with everyone on Christmas Eve). We would always "over sprinkle" a cookie, which had to be eaten right away. I recall one year, when my cousin ate so many, she got sick. Good times!

Because I have a feeling I'm going to be up to my eyeballs in cookies and fudge, I decided to halve this recipe. In hindsight, this was not a good idea. I think it was the egg and egg yolk ratio that I went with. Don't let these pictures fool you...these little devils are as hard as a rock. I don't blame Dorie's Grandma...I blame myself. My husband, however, thought these were the best sugar cookies ever and stuffed two in his mouth in less than a minute.


12.07.2008

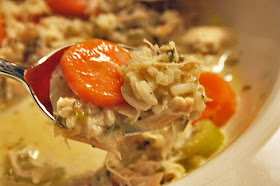
Creamy Wild Rice and Chicken Soup


I've been trying to give her a second chance. Every month, I buy her magazine. I clip out dozens of her recipes. Yet, each one I try is a flop. And doesn't make it to Vanilla Bean. We tried to give her a try again with this recipe and I am happy to report it is fantastic! We've adapted it a bit...making it easier and perfect for a weeknight meal. We used a rotisserie chicken from the grocery store. It saved cooking time and we have leftovers for BBQ Chicken Pizza tomorrow!

Creamy Wild Rice and Chicken Soup
Adapted from Rachael Ray's magazine


6 cups of chicken broth
3 tbls olive oil
1/4 cup diced onion
2 tbls sage
1 bay leaf
Salt and pepper
One 6-ounce box long grain and wild rice mix (We used the Chicken flavor and added the spice mix in the box to the pot)
1/2 of a rotisserie chicken, shredded
1/2 cup heavy cream
4 chopped carrots
3 stalks of celery, chopped

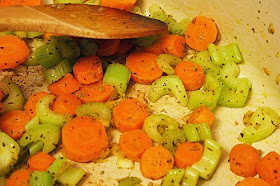
In a large pot, heat the olive oil over medium high heat. Add the carrots, onion, celery and sage. Season with salt and pepper. Cook until crisp-tender, about 5 minutes.


Stir in the broth, the rice mix and seasoning, and the bay leaf. Bring to a boil. Add the chicken, lower the heat, and simmer, stirring occasionally. Cook until the rice and carrots are tender, about 30 minutes. Stir in the heavy cream, simmer for a few minutes, and serve.

Snowball Cookies

I grew up in Minnesota and now live in Missouri. We only get back for Christmas every other year, and this year ain't it. So it is imperative that I bake all the holiday goodies I would have if I were Up North. Snowball Cookies are about as "home" as I can think. My Grandma Gloria made them. My mother would have tins of them in the garage (they are a great cookie to freeze and in MN, it is freezing in the garage). Since I have a ton of baking to do this holiday season, I decided to make these first.

3/4 cup butter, room temperature
1/2 cup sugar
2 tsp vanilla
1 egg
2 cups of flour
1/2 tsp salt
1 cup chopped nuts (I used walnuts)
1 cup mini chocolate chips (I used regular sized and they still worked)

Combine the butter, sugar, vanilla and egg in a mixer. Add the flour, salt, nuts and chocolate chips. Roll into balls. Bake at 350 degrees for 15-20 min.


Take the cookies out of the oven. Allow to cool and roll in powdered sugar. They freeze well. If you want, wrap them up and put in the freezer. Or, if it is cold enough, in the garage.


11.29.2008

Daring Bakers: Caramel Cake with Caramelized Butter Frosting


You know it is going to be an exciting Daring Bakers challenge when the words "very dangerous" and "for safety reasons" are in the baking instructions. I've been mentally preparing myself for this recipe all month. And, I am happy to say I came out virtually unharmed.

First, let me give a nod to Shuna Fish Lydon of Eggbeater for this recipe. The direct link to her recipe is here. Also thanks to the November hosts: Dolores of http://culinarycuriosity.blogspot.com/, Alex from http://blondieandbrownie.blogspot.com/, Jenny from http://forayintofood.blogspot.com/, and Natalie from (http://glutenagogo.blogspot.com/.

I decided to make these as cupcakes. Just easier to share that way. I also opted not to do the extra challenge: the caramels. I remember the horror stories my Aunt Janie would tell me of the caramels she makes every year for Christmas. If I am feeling brave enough, I might attempt those in December. Otherwise, I am content just to make the caramel cake.


These cupcakes turned out very moist and heavy. You can do curls with them. I also didn't care much for the frosting...it is very sweet. It was suggested that you should add salt to the frosting to help cut the sweetness. I sprinkled the cupcakes with crushed peanuts and coarse sea salt. The salt works wonders!

Caramel Cake with Caramelized Butter Frosting

10 Tablespoons unsalted butter at room temperature
1 1/4 Cups granulated sugar
1/2 teaspoon kosher salt
1/3 Cup Caramel Syrup (see recipe below)
2 each eggs, at room temperature
splash vanilla extract
2 Cups all-purpose flour
1/2 teaspoon baking powder
1 cup milk, at room temperature

Preheat oven to 350F. Line muffin tin with paper cups. In the bowl of a stand mixer fitted with a paddle attachment, cream butter until smooth. Add sugar and salt & cream until light and fluffy. Slowly pour room temperature caramel syrup into bowl. Scrape down bowl and increase speed. Add eggs/vanilla extract a little at a time, mixing well after each addition. Scrape down bowl again, beat mixture until light and uniform. Sift flour and baking powder.Turn mixer to lowest speed, and add one third of the dry ingredients. When incorporated, add half of the milk, a little at a time. Add another third of the dry ingredients, then the other half of the milk and finish with the dry ingredients. {This is called the dry, wet, dry, wet, dry method in cake making. It is often employed when there is a high proportion of liquid in the batter.}Take off mixer and by hand, use a spatula to do a few last folds, making sure batter is uniform. Turn batter into muffin tins and bake for about 15 min. Bake until sides pull away from the pan and skewer inserted in middle comes out clean. Cool cake completely before icing it. Cake will keep for three days outside of the refrigerator.

Caramel Syrup

2 cups sugar
1/2 cup water
1 cup water (for "stopping" the caramelization process)

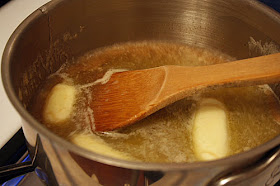
In a small stainless steel saucepan, with tall sides, mix water and sugar until mixture feels like wet sand. Brush down any stray sugar crystals with wet pastry brush. Turn on heat to highest flame. Cook until smoking slightly: dark amber.When color is achieved, very carefully pour in one cup of water. Caramel will jump and sputter about! It is very dangerous, so have long sleeves on and be prepared to step back.

Whisk over medium heat until it has reduced slightly and feels sticky between two fingers.
Note: For safety reasons, have ready a bowl of ice water to plunge your hands into if any caramel should land on your skin.

Caramalized Butter Frosting

12 tablespoons unsalted butter
1 pound confectioner’s sugar, sifted
4-6 tablespoons heavy cream
2 teaspoons vanilla extract
2-4 tablespoons caramel syrup
Kosher or sea salt to taste

Cook butter until brown. Pour through a fine meshed sieve into a heatproof bowl, set aside to cool. Pour cooled brown butter into mixer bowl. In a stand mixer fitted with a paddle or whisk attachment, add confectioner's sugar a little at a time. When mixture looks too chunky to take any more, add a bit of cream and or caramel syrup. Repeat until mixture looks smooth and all confectioner's sugar has been incorporated. Add salt to taste.

Note: Caramelized butter frosting will keep in fridge for up to a month.To smooth out from cold, microwave a bit, then mix with paddle attachment until smooth and light.


11.24.2008

Thanksgiving Sneak Peek & TWD

I don't think I have ever been so excited for Thanksgiving as I am this year. Jeff and I are busy packing up the Vanilla Bean kitchen and bringing it to the Lake of the Ozarks. After pouring over dozens of recipes during the last month, we finally came up with a menu. I wanted to keep things relatively simple...it is a vacation after all. The following won't keep us trapped in the kitchen all day:

Traditional Thanksgiving Turkey, brined in Williams Sonoma seasoning
Sausage Apple Dressing, adapted by Vanilla Bean from the Food Network
Roasted Garlic Mashed Potatoes, Everday Food
Honey Glazed Carrots, Everday Food
Chocolate Pie, Kraft Foods
Thanksgiving Two-fer Pie, Dorie Greenspan, Baking From My Home to Yours

For leftovers, we will be making Turkey Croquettes, Martha Stewart, and Turkey and Cranberry Ravioli, Giada De Laurentiis. All recipes and photos will be posted when we return, so stay tuned!

Our first task is the brine. Thanks to the Pioneer Woman for her suggestion on the Apple and Spices Turkey Brine at Williams Sonoma. It smells awesome and includes apples, sea salt, juniper berries, star anise, garlic, bay leaf, lemon peel and other spices. Here it is....looking all delicious. We are brining it in a bag for about 36 hours.


Also, here is a peek at the Two-fer pie for this week's Tuesdays with Dorie. It was chosen by Vibi from La Casserole Carrée. You can find the recipe on her blog. I made a smaller version of the pie...about 7 inches. Basically, it is a combo of pumpkin and pecan pie. I don't think mine layered quite how it was supposed to. It looks awesome, though. I'll let you know how it tastes after tomorrow! Happy Thanksgiving!

11.20.2008

Winter Squash Soup with Gruyere Croutons

Everyone is doing it. Butternut Squash Soup. Acorn Squash Soup. One of the best is at Eleven Eleven Mississippi. This was my first time making it at home and this is a great recipe. I found it on one of my favorite blogs, Smitten Kitchen. The actual recipe came from Bon Appetit magazine.

I made some alterations to the recipe. Since Jeff won't eat squash (no matter how much I try to convince him that it is yummy) I halved the recipe. I used one acorn squash and I roasted it in the oven first for about 45 min. on 350 degrees (or whatever it said on the label). I am not sure I liked the cumin in the soup...next time I will probably try it without.

Winter Squash Soup
1/4 cup (1/2 stick) butter
1 large onion, finely chopped
4 large garlic cloves, chopped
3 14 1/2-ounce cans low-salt chicken broth
4 cups 1-inch pieces peeled butternut squash (about 1 1/2 pounds)
4 cups 1-inch pieces peeled acorn squash (about 1 1/2 pounds)
1 1/4 teaspoons minced fresh thyme
1 1/4 teaspoons minced fresh sage
1 1/2 teaspoons ground cumin
1/2 teaspoon ground ginger
1/8 cup whipping cream

Melt butter in large pot over medium heat. Add onion and garlic and sauté until tender, about 10 minutes. Add broth, all squash and herbs; bring to boil. Reduce heat, cover and simmer until squash is very tender, about 20 minutes. Working in batches, puree soup in blender. Return soup to same pot. Stir in cream and sugar; bring to simmer. Season with salt and pepper.
(Can be made 1 day ahead. Chill. Rewarm over medium heat before serving.)


Croutons
2 tablespoons (1/4 stick) butter
24 1/4-inch-thick baguette bread slices
1 cup grated Gruyere cheese
1 teaspoon minced fresh thyme
1 teaspoon minced fresh sage

Preheat broiler. Butter 1 side of each bread slice. Arrange bread, buttered side up, on baking sheet. Broil until golden, about 1 minute. Turn over. Sprinkle cheese, then thyme and sage over. Sprinkle with salt and pepper. Broil until cheese melts, about 1 minute. Ladle soup into bowls.
Top each with croutons and serve.


11.18.2008

TWD Comeback

Things have been quiet in the Vanilla Bean kitchen lately. Believe it or not, it is pretty time consuming searching for new and exciting recipes. Not to mention the grocery shopping, the actual time spent in the kitchen, setting up the camera equipment, and writing the witty commentary. Frankly, it is exhausting. To top it off, the largest event I plan was held this past Saturday. Finally I have my life back. First order of business, Tuesdays with Dorie.

I am not excited about the November line-up. If I can't get my husband or co-workers to eat it, I don't want to make it. Instead of missing another week, however, I decided to make a past recipe. I chose the Chocolate Whopper Malted Drops as chosen in September by Rachel of Confessions of a Tangerine Tart. You can find the recipe on her site.

Probably the most important thing is that Dorie neglected to put an oven temp in the recipe. After looking at all of her other cookie recipes, I chose 350 degrees (most were made at that temp) and they turned out fine. Delicious, in fact. The cookies have chopped malted milk balls, chocolate chunks, and cocoa powder. They went perfect with a glass of milk. And, tonight I am warming them up and putting them on some ice cream.

10.27.2008

Daring Bakers: Pizza Challenge

If there is one thing I have learned from the last two Daring Bakers monthly challenges, it is this: when working with yeast, always remove your rings and wash hands thoroughly before putting them back on. Both times I remembered this too late, put on a yeast/dough-packed wedding ring, and watched as my finger broke out, turning all red and scaly. However, that is not really appetizing...so, let's move on to the October challenge: Pizza! This month's challenge was chosen by Rosa of Rosa’s Yummy Yums. Thanks!

Not only did we have to make our own pizza dough, which is not new to us, put we also had to toss it. Here are the pics:


While it appears I have hung the dough from the ceiling fan, I assure you that did not happen. Things go much smoother in the Vanilla Bean Kitchen. We run a pretty tight ship here.

We made a Radicchio, Shrimp and Fontina pizza and a Sun-Dried Tomato, Black Olive and Goat Cheese pizza. Both were awesome. This is a great pizza dough recipe. While it sucks it is a two-day recipe, it did make 6 pizza crusts. So, we have 4 more in the freezer just waiting to be used.

Something to note about cooking your pizza: we didn't have a peel to transfer the dough to the pizza stone we had heating in the oven. So, we used the back of a jelly roll pan (as it explains in the recipe). That worked just as well.

Sun-Dried Tomoato, Black Olive and Goat Cheese
(I just winged it...so measurments aren't exact)


Drizzle basic pizza dough crust (recipe below) with olive oil. Sprinkle on crumbled goat cheese, chopped sun-dried tomatoes, chopped black olives, and 2 cloves roasted garlic, chopped. Toss on some dried basil and oregano for more flavor.


Radicchio, Shrimp and Fontina Pizza
from The Little Guides: Pizza

basic pizza dough crust (see recipe below)
6 cloves of roasted garlic, chopped
Olive Oil, to cover
10-12 large shrimp
1 tbls. evoo
1/4 head radicchio, chopped
1 1/2 tbls. finely chopped basil
4-5 oz. Fontina cheese


We didn't think the 7-8 min. in the oven as directed in the basic pizza dough recipe would be enough to cook the shrimp. So, we cooked them slightly before putting them on the pizza. Scatter the radicchio, garlic and basil over the dough. Top evenly with cheese and finally the shrimp. Season to taste with salt and pepper and drizzle with a little evoo.


BASIC PIZZA DOUGH
From “The Bread Baker’s Apprentice” by Peter Reinhart
Makes 6 pizza crusts (about 9-12 inches/23-30 cm in diameter)

Ingredients:
4 1/2 Cups (20 1/4 ounces/607.5 g) Unbleached high-gluten (%14) bread flour or all purpose flour, chilled
3/4 Tsp Salt
1 Tsp Instant yeast
1 3/4 Cups (14 ounces/420g or 420ml) Water, ice cold (40° F/4.5° C)
1 Tb sugar

DAY ONE
1. Mix together the flour, salt and instant yeast in a big bowl (or in the bowl of your stand mixer).
2. Add the oil, sugar and cold water and mix well (with the help of a large wooden spoon or with the paddle attachment, on low speed) in order to form a sticky ball of dough. On a clean surface, knead for about 5-7 minutes, until the dough is smooth and the ingredients are homogeneously distributed. If it is too wet, add a little flour (not too much, though) and if it is too dry add 1 or 2 teaspoons extra water. NOTE: If you are using an electric mixer, switch to the dough hook and mix on medium speed for the same amount of time.The dough should clear the sides of the bowl but stick to the bottom of the bowl. If the dough is too wet, sprinkle in a little more flour, so that it clears the sides. If, on the contrary, it clears the bottom of the bowl, dribble in a teaspoon or two of cold water.The finished dough should be springy, elastic, and sticky, not just tacky, and register 50°-55° F/10°-13° C.

3. Flour a work surface or counter. Line a jelly pan with baking paper/parchment. Lightly oil the paper.

4. With the help of a metal or plastic dough scraper, cut the dough into 6 equal pieces (or larger if you want to make larger pizzas).NOTE: To avoid the dough from sticking to the scraper, dip the scraper into water between cuts.

5. Sprinkle some flour over the dough. Make sure your hands are dry and then flour them. Gently round each piece into a ball.NOTE: If the dough sticks to your hands, then dip your hands into the flour again.

6. Transfer the dough balls to the lined jelly pan and mist them generously with spray oil. Slip the pan into plastic bag or enclose in plastic food wrap.

7. Put the pan into the refrigerator and let the dough rest overnight or for up to three days. NOTE: You can store the dough balls in a zippered freezer bag if you want to save some of the dough for any future baking. In that case, pour some oil(a few tablespoons only) in a medium bowl and dip each dough ball into the oil, so that it is completely covered in oil. Then put each ball into a separate bag. Store the bags in the freezer for no longer than 3 months. The day before you plan to make pizza, remember to transfer the dough balls from the freezer to the refrigerator.

DAY TWO
8. On the day you plan to eat pizza, exactly 2 hours before you make it, remove the desired number of dough balls from the refrigerator. Dust the counter with flour and spray lightly with oil. Place the dough balls on a floured surface and sprinkle them with flour. Dust your hands with flour and delicately press the dough into disks about 1/2 inch/1.3 cm thick and 5 inches/12.7 cm in diameter. Sprinkle with flour and mist with oil. Loosely cover the dough rounds with plastic wrap and then allow to rest for 2 hours.

9. At least 45 minutes before making the pizza, place a baking stone on the lower third of the oven. Preheat the oven as hot as possible (500° F/260° C). NOTE: If you do not have a baking stone, then use the back of a jelly pan. Do not preheat the pan.

10. Generously sprinkle the back of a jelly pan with semolina/durum flour or cornmeal. Flour your hands (palms, backs and knuckles). Take 1 piece of dough by lifting it with a pastry scraper. Lay the dough across your fists in a very delicate way and carefully stretch it by bouncing it in a circular motion on your hands, and by giving it a little stretch with each bounce. Once the dough has expanded outward, move to a full toss.

11. When the dough has the shape you want (about 9-12 inches/23-30 cm in diameter - for a 6 ounces/180g piece of dough), place it on the back of the jelly pan, making sure there is enough semolina/durum flour or cornmeal to allow it to slide and not stick to the pan.

12. Lightly top it with sweet or savory toppings of your choice.

13. Slide the garnished pizza onto the stone in the oven or bake directly on the jelly pan. Close the door and bake for about 5-8 minutes.

14. Take the pizza out of the oven and transfer it to a cutting board or your plate. In order to allow the cheese to set a little, wait 3-5 minutes before slicing or serving.

Check out the other Daring Bakers at http://daringbakersblogroll.blogspot.com/